Hiltzy’s BBQ is a Reality

Posted on

Well after years of practice at home I have decided to undertake a new challenge. My weekends will hopefully be filled with the smells and tastes of BarBeCue. I will be ordering a new smoker from Abe’s Smokers of Roseville, MI (https://abessmokers.com) to the size of a 60 vertices reverse flow smoker.

I’ve had the opportunity to see how they build these and I am really impressed with how they make them.

So my logo for Hiltzy’s BBQ IS

20140322-103418.jpg

Be sure to follow me on twitter (http://twitter.com/hiltzysbbq) and on Facebook (http://www.facebook.com/hiltzysbbq)

Looking forward to cooking.

Char Griller 5050 Reverse Flow Modification

Posted on

Well, I’ve been looking at some of the issues with my current smoker. I currently have two smokers, one a Smoke Hollow electric upright smoker and a Char Griller 5050 Dual gas and charcoal with offset firebox.

The problem with the offset is that there is a hot spot on the left where the firebox was. As a result you must rotate items to prevent them from over cooking.

In an effort to fix this I decided to modify the configuration by adding a steel plate inside the charcoal side to channel smoke and heat to the left side away from the firebox. The next issue was the vent stack. With this being mounted on the left hand side, smoke would flow straight up. Off to Loews to buy a 3 1/4 inch hole on the right side. I moved the vent stack over to the right and covered the old hole on the left.

To prevent heat and smoke loss, I used a 700 degree silicone gasket sealant to fill the gaps.

Here is my video of the modifications.

My YouTube Smoker Modifications

Posted on

Making Pork Ribs – St Louis Style

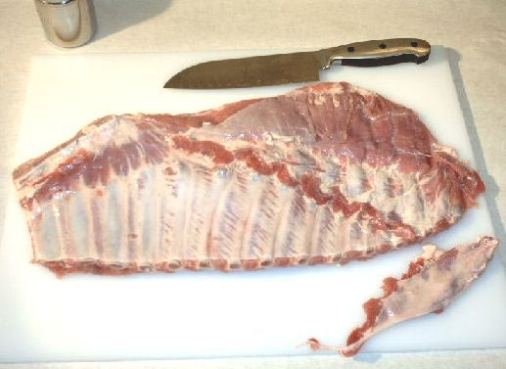
Start with St Louis Style ribs.  If your ribs have the Briskets attached as below either trim it or have the butcher trim it for you.

Image

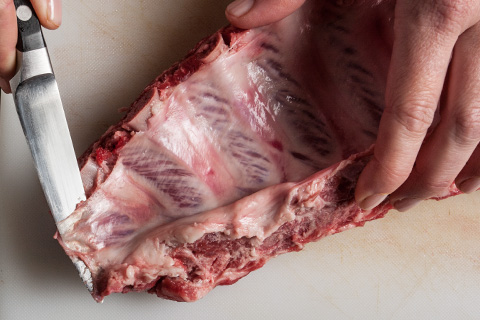
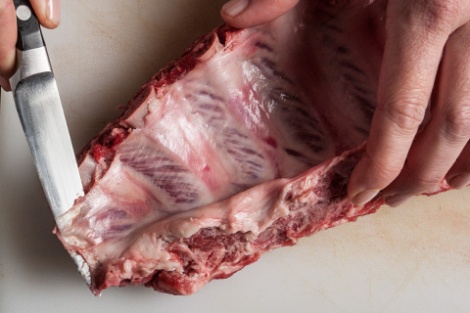
Then turn the ribs meat side down and bone side up.  From there use a small paring knife to start to remove the membrane off of the back.  This is something you want to remove otherwise it makes the back of the ribs very rubbery.

Image

Now that you have gotten this membrane started you will find it is very slippery.  DO not use a knife to remove this.  Use a paper towel (or paper napkin works too) and grab that small start.  Now simply lift and pull.

Image

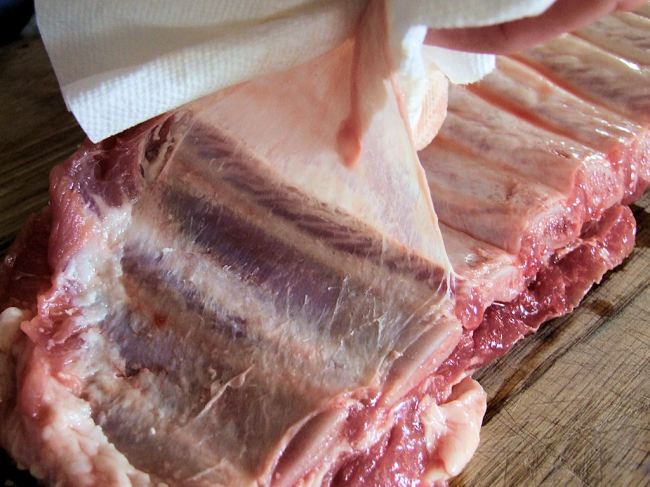
The membrane pulls right off.

Next prepare a brine solution.  ¼ cup of Brown Sugar (I like Dark Brown Sugar) and ¼ cup of Sea Salt to a quart of water. Make enough to completely cover your ribs.

ImageImage

 You can heat the water to dissolve everything and then let it cool.  Place you ribs in a container that fits in your fridge.  You want to cold brine them.  Cover the meat with brine solution and cover with plastic wrap.  Place in fridge for 8-12 hours (whatever works for your cooking timeframe) given you still need 4-5 hours for marinade and 6 hours for cooking.

After the brining is complete, remove the ribs and wash with cold water.  I use my sink sprayer for this.  Then dry with paper towels.

Next is the rub.

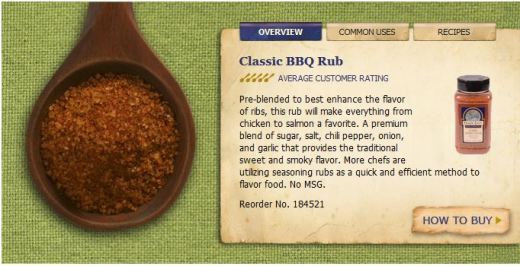
I use the Classic BBQ Rub from Gordon Food Service,

Image

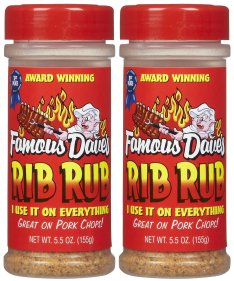
If you don’t have access to Gordon’s Food service, you can use the Famous Dave’s Rib Rub as Gordon’s is not in your area.  You can get it at any local grocery store.

Image

Cover the top and bottom of the ribs generously.

Then cover with plastic wrap and into the fridge for 4-5 hours.  I usually do four.

 Image

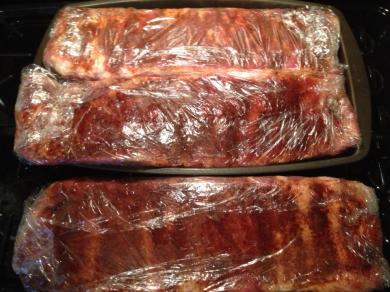
Now that the ribs are trimmed, brined and marinated, remove the ribs from fridge and let set on the counter still wrapped up. Let them rise to room temperature.

What I do is add a pile of whole chuck charcoal (briquettes work too) into the fire box.  Then using a charcoal chimney, I light 15-20 pieces of charcoal.

Image

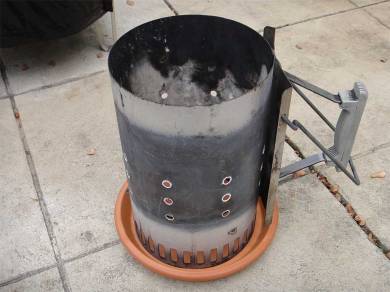
This prevents any chemical tastes from liquid starter fluid. Once the coals are started dump them on the coals in your firebox.  Remove the ribs from fridge and let set on the counter still wrapped up.

I keep my top vent wide open and my side vent on the firebox closed completely. In about a half hour your charcoal is ready. This should maintain a constant 250 degrees.  Mine is perfect this way.

Add the ribs to the chamber.  Add your wood to the fire.  Some places say to soak the wood, some say not to.  I don’t.  Cherry and Apple are the most typical woods for smoking.

Image

Now remember your right hand side of the coals chamber is hottest if you have the side firebox.  If you are doing multiple ribs like this, you need to accommodate for the heat.  I use the 3-2-1 method of cooking.  This means three hour smoking, two hours cooking and one hour finishing.  For the first three hours ,every hour I go out and move the far right ribs to the far left and move everything else one spot to the right for three hours. That’s the first part of the 3-2-1 method.

I now take my ribs and put them in a large aluminum tray.  I add one can of beer, you can use apple juice or any liquid.  Cover tightly with foil.  Now leave them in this smoker for two hours still covered. At this point the smoke will not penetrate anymore and the steam will help the meat to finish cooking.  This is the second part of the 3-2-1 method.

The last hour open the tray and remove the foil.  If you can, try and salvage the foil.  Remove the ribs from the tray and place them back on the smoker.  Remove the drippings from the tray and again salvage it for later.

Image

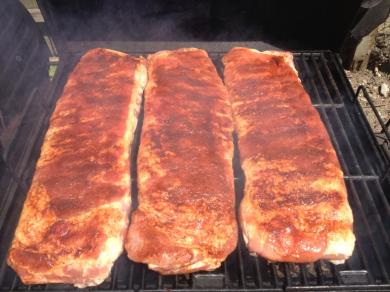
They will remain in the smoker for the next hour.  This is the third and last part of the 3-2-1) method.  DO NOT ADD SAUCE yet.  If you do sugars in it will burn and leave a nasty taste.  Remember your firebox location and address for that.  (Notice my ribs on the left are already falling apart)

The last 20 minutes of Cook time is when you add your sauce. Adding it now will give you a nice flavor and stickiness without the burn.  You can use any commercial sauce or make one of your own.  Sometimes I like to offer different sauces for the people I’m feeding so I sometimes leave it be and add the sauce on the side.

Once you remove from the ribs after the end of the 6th hour, return them to the tray you used to cook in and recover with foil.  Rest these in the oven for a half hour.  The time is done.  Now cut into one to two bone portions and enjoy.

Review Flavor Flav’s Chicken & Ribs

Posted on

Well in January of 2013 a new place opened in Sterling Height, MI. Flavor Flav’s Chicken and Ribs on 15 Mile just East of Van Dyke. After looked at postings of the place I went in with reserved expectations.

Giving a new place is always a risk. So with this in mind I decided to take the family. My two Teenage sons were actually excited to try it. Particularly so when they discovered that Chicken and Waffles were on the menu. My wife was even curious. On May 31st off we went for dinner.

20130531-195221.jpg
The restaurant seats about 40 people in 3 booths, 6 tables for 4, 6 tables for 2 and a window shelf that seats 5-6 people. The flow of the entrances works well. People are greeted very friendly and the staff seems to genuinely enjoy their jobs. Many places underestimate the importance of that first impression and the intangible value that it brings.

Being that this is not a fast food restaurant, don’t expect to get your order immediately. As a result upon placing and paying for your order, you are given a table stand with a number. As your as your order is prepared the staff delivers it to your table. Another nice touch.

As is typical when I visit a new place, I opted for the combo plate. This time, what else, chicken and ribs.

20130531-200928.jpg
This was actually more ribs at a half rack. As for the ribs, I’ll start by saying the no where does anything say that this is a BBQ place. As a result the first bite confirmed that there was no smoke ring, nor any noticeable smoke taste. As for the taste it was good. The ribs were moist and fresh. They came off the bone completely and cleanly. Nice job! The chicken was broasted rather than smoked. Now I typically don’t go for deep fried chicken. Frankly I was surprised. The outer coating was nicely coated and surprisingly nice. It was not greased at all. In fact it was very crisp mean

Read the rest of this entry

Pork Picnic or Boston Butt?

Posted on

When considering to make pulled pork the question always is should I use the Picnic or The Boston Butt cut of the pig.  I have used both with wonderful results.  So the question is where are these two cuts of meat from?  Well this image shows them quite well.

The front leg of the pig shows the Boston Shoulder and the Picnic Shoulder.  What I find is that either one will give you a great smoked pulled pork.  However, there are a few things to be aware of depending on where you purchase your meats.  If you have a local butcher, well then you can tell them what you would like done.  I purchase my meats at a local retail change where they will still modify cuts for you.  However I don’t always have time to do this.

From a personal perspective, after having used both, I like the Boston Butt for a couple of reasons.  When I make Pulled Pork, I like a nice fine shredding of the meat so that the consistences is a little more even.  To obtain this I shred by hand with two forks.  This means I can get a nice fine consistency to the end product.  This is typically the case if I smoke it long or short with higher temperatures. The Picnic cut does still give a great flavor but I found that the shredding lends to a longer stringier type of shred.  Typically I will go with the Boston Cut but if the Picnic is on sale, well economics comes into play for personal cooking.

Smoked chuck roast

So tonight I decided to try something new. I took a 3 pound chuck roast marinated it and put it on the smoker for a good five hours. Being that it’s 3 1/2 pounds rule of fun as 1.5 hours reach pound of meat, So this means I was in the for a four to five hour range for this particular cut.

Now for the marinade recipe if you look at an earlier post I mentioned that I had a great steak marinade. I used the same marinate the chuck roast however rather than marinade and rather than leave it in the refrigerator, I left it on the counter so that it was going to the smoker quicker.

In the smoker I lined up a pile of charcoal and started some on the chimney. I added it to the far right hand side of the fireboxwith the damper the firebox close completely. This would allow me to dump the lit charcoal in the far end and then let it burn across.

Here a is my video of it. http://www.youtube.com/watch?v=XV7nhscgYEA&feature=youtube_gdata_player

Bad Brads BBQ – New Baltimore, MI

Posted on

Well tonight I visited Bad Brads of New Baltimore. I’ve heard great things and wanted to give it a try. So I drove out to New Baltimore. Given that I do my our BBQing I know a thing or two.

One of my joys is try new places and see what they consider as good food. I truly enjoy speaking with Pit-masters at the places I visit.

On tonights visit I wanted to try as many different things as possible on one visit. So, I opted for the two meat combo and added a quarter rack of ribs.

Presentation and portion sizes were impressive. This might be good.

20120906-224556.jpg

For the sides I asked what were the top sellers. I was informed that the “Pit Beans” and “Collard Greens” we’re the ones. This was followed by the “Sweet Potato Mash”. I chose the Pit Beans and the BBQ Chili.

As for the meats I went with the BBQ standards of Sliced Brisket and Pulled Pork.

20120906-225122.jpg

20120906-225131.jpg

These were very nice and tender. Next was the ribs.

20120906-225222.jpg

So what is the verdict? Let’s start with the ribs. A good rib should have an evident texture, flavor, and consistency. With good BBQ Ribs the rub must enhance the flavor of the meat. The ribs were a perfect temperature, the meat fell off the bone nicely, and there was an evident smoke ring. However this smoke ring was thin. This did affect the flavor. There wasn’t much smoke taste to the meat.

Next lets discuss the rub. The rub was evenly applied to the ribs. As I stated earlier, the rub must enhance the meat. I found that the rub had little flavor and did not enhance the taste. The ribs needed a sauce to have any significant flavor. Overall the ribs were good, but I would not call the memorable.

Next lets discuss the brisket. This cut of meat is one that can be very flavorful when prepared correctly. With this choice, just as with the ribs, the meat was cooked to perfection. Very nice and tender but also lacking a significant smoke flavor. Here too I found that bark formed from the rub was even and tender. The smoke ring was more obvious than the ribs but again overall the brisket needed sauce.

That takes me to the pulled pork. This is one of my particular specialties. The portion was very generous. The meat was nice and tender and clearly cocked for several hours. I did find a few outer parts to taste. Here I was looking for rub flavoring, smoke taste and the telltale pink of infused smoke. All of these elements were missing again requiring sauces. This too was not the expectation based upon what I have heard.

That brings me to the sides. I’ll start with the chili.

20120906-231307.jpg

The presentation was excellent. As you can see cheddar cheese, green onions and guacamole over the chili. The flavors blended very nicely. I found the heat if the chili just right but I fear it might be a little much for my wife. I also noted no beans of any type and very limited meat in it.

Next was the Pit Beans. This was my favorite part of the meal.

20120906-231646.jpg

Again a nice presentation. Lots of meat, a variety of beans and finally that deep smoke flavor I had been searching for. These beans had it.  There was plentiful meat however, rather than burnt pork ends this chili was made with rib tips.  How can I be sure, well I found bits of the rib cartilage in the larger pieces of meat.  This was a detraction for me.

All in all it was a decent meal and I did go in with high expectations. Needless to say my expectations were not met and I was not “Wowed” like I was hoping to be.  To be honest, I will give them one more try in the future.

Fantastic Steak Marinade

Posted on

Steak Marinade

When grilling steaks they can be wonderful to shoe leather in terms of tenderness. My lovely wife Anita used to douse her steaks in BBQ sauce. My boys loved the steaks as did I. After taking the family to a couple of Steak Houses in Walt Disney World, I wanted to recreate those flavors.

That’s when I learned about marinades. So I researched marinades and found one that has worked. Here is what I do. I usually do three steaks at a time with this mix. These can be round steaks, porterhouse, T-bones, rib-eyes or even a chuck roast.

In a 1 gallon plastic Zip-Lock style bag, add 1/4 cup of Worshirecester Sauce, 1/4 cup of Extra Virgin Olive oil and 1 tablespoon of garlic powder. Shake the bag to mix well.

As for the meat, this gets seasoned with Montreal Steak Seasoning. Place the meat into the bag with the marinade, place this in the fridge where I usually leave it in for four hours. Be sure to take them out to raise to room temperature and then on the grill for 7-8 minutes per side on the grill turning only once. Be sure the grill is hot so that you can get the nice crossed grill marks.

With this process now in full production mode, Anita no longer uses any sauce on her steaks. Oh she also used to prefer well done. Now she loves medium rare.

20120810-105812.jpg

Roasted Chicken

Posted on

Tonight I decided to roast some boneless chicken breasts. I used my cherry wood but had the heat higher than I do for smoking.

Here is the recipe.

2 twigs of fresh rosemary finely chopped
4 twigs of fresh thyme finely chopped
2 lemons juiced
1/3 cup of extra virgin olive oil
1 tbs garlic powder
1 tsp sea salt
6 boneless chicken breast halves pounded flat

Mix all ingredients in a Zip-lock bag until mixed well. Add the chicken yo the bag letting all chicken pieces cost with the marinade. Let sit in the fridge 2-3 hours.

Roast for about 10 minutes per side over cherry wood at about 350 degrees. Turn and rotate around the grill to ensure even cooking

20120717-213938.jpg

Goalie Pads – Reebok L9 Larceny

Posted on

Danny’s growth and usage has started a break down of his Bauer Vapor X55 pads.  One strap has been cut, another is splitting and his catcher has had a few things let go.  Needless to say almost 2 years out of them has been good considering his in them at least three times a week.  So off we went to Perani’s as a necessary evil.  He was able to choose pads and a color he wanted as a result he went with the Reebok Larceny L9 pads, blocker and Catcher.   Here they are!